The Honeywell TH8321WF1001 is a Wi-Fi enabled thermostat designed for smart home integration. It offers voice control through Amazon Alexa and Google Assistant‚ ensuring seamless temperature management. With energy-saving features and remote access via the Honeywell Home app‚ it provides a convenient and efficient way to regulate indoor comfort.
1.1 Overview of the Honeywell TH8321WF1001 Model
The Honeywell TH8321WF1001 is a Wi-Fi-enabled thermostat designed for smart home integration‚ offering advanced temperature control and energy efficiency. It supports voice commands through Amazon Alexa and Google Assistant‚ ensuring seamless operation. With features like scheduling‚ remote access‚ and IAQ settings‚ it provides a modern solution for home comfort. This model is part of Resideo’s Honeywell Home series‚ built to meet specific household needs with compatibility for various HVAC systems.
1.2 Key Features and Benefits
The Honeywell TH8321WF1001 offers advanced features like Wi-Fi connectivity‚ voice control via Amazon Alexa and Google Assistant‚ and remote access through the Honeywell Home app. It supports scheduling‚ energy-saving modes‚ and IAQ settings for improved indoor air quality. The thermostat is compatible with various HVAC systems‚ including heat pumps‚ and provides a user-friendly interface for easy temperature management. Its energy-efficient design helps reduce utility bills‚ while smart home integration enhances convenience and comfort. The thermostat also includes a lock screen feature for added security.
1.3 Compatibility with Home Systems
The Honeywell TH8321WF1001 is compatible with most HVAC systems‚ including heat pumps‚ gas‚ oil‚ electric‚ and dual-fuel setups. It supports up to 3 stages of heating and 2 stages of cooling‚ making it versatile for various home configurations. The thermostat also integrates with indoor air quality (IAQ) accessories‚ enhancing overall comfort control. Its universal design ensures compatibility with a wide range of systems‚ though verifying system compatibility before installation is essential for proper functionality.

Pre-Installation Requirements
Before installing‚ ensure compatibility with your HVAC system and gather necessary tools like a screwdriver and wire strippers. Verify wiring setup and consult the manual for specific guidelines to avoid errors during installation.
2.1 Checking Compatibility with Your HVAC System
Before installing the Honeywell TH8321WF1001 thermostat‚ ensure it is compatible with your HVAC system. Verify the system type (e.g.‚ heat pump‚ furnace‚ or air conditioner) and voltage requirements. Check if your system uses 24V AC or requires a common wire (C-wire). Consult the installation manual or contact Honeywell support if unsure. Proper compatibility ensures smooth operation and avoids potential malfunctions or damage to the system. Always confirm wiring configurations match the thermostat’s specifications.
2.2 Gathering Necessary Tools and Materials
Before starting the installation‚ ensure you have all required tools and materials. You’ll need a screwdriver (both flathead and Phillips)‚ wire strippers‚ and a voltage tester to safely work with electrical systems. Additionally‚ gather wire nuts‚ connectors‚ and mounting screws provided with the thermostat. If your wall lacks the necessary anchors‚ prepare wall anchors and a drill. Having the installation manual handy is crucial for guidance. Ensure all materials are compatible with your HVAC system to avoid installation issues.
2.3 Understanding the Wiring Setup
Understanding the wiring setup is crucial for a successful installation. The Honeywell TH8321WF1001 uses standard HVAC wiring‚ with terminals labeled R‚ W‚ Y‚ G‚ C‚ and O/B. Ensure the wires match their respective functions‚ such as R for power‚ W for heat‚ and Y for cooling. Refer to the old thermostat’s wiring as a guide. If your system uses a heat pump‚ the O/B terminal will be used. Always verify compatibility with your HVAC system to avoid connection issues. Consulting the installation manual or a professional is recommended if unsure.
Installation Process
Replace the old thermostat by disconnecting wires‚ then mount the new Honeywell TH8321WF1001. Connect wires to correct terminals‚ ensuring proper color coding for HVAC compatibility. Power on and configure settings.
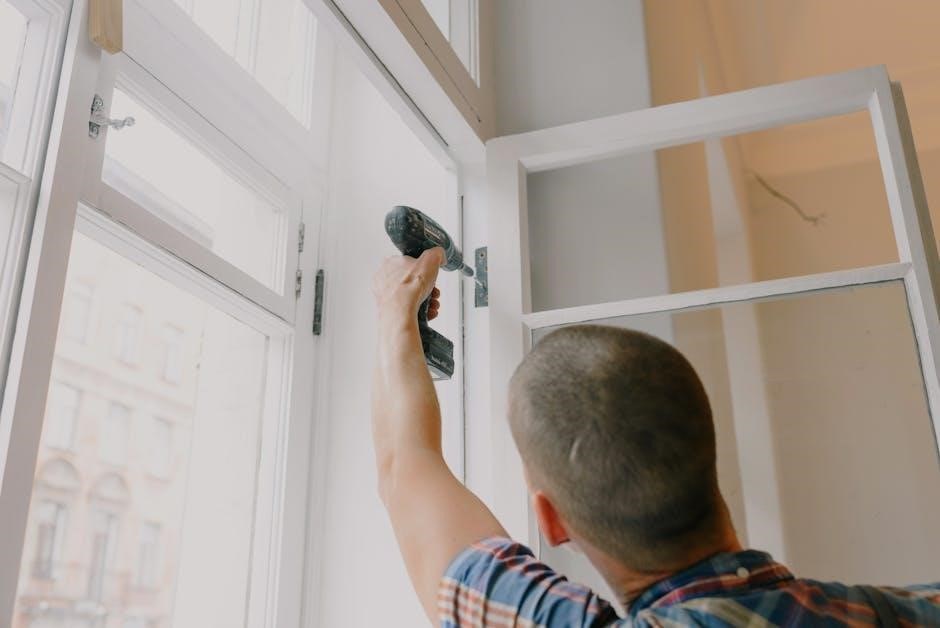
3.1 Removing the Old Thermostat
Before installing the new Honeywell TH8321WF1001 thermostat‚ ensure the HVAC system is powered off at the circuit breaker. Remove any screws securing the old thermostat’s faceplate and gently pull it away from the wall. Label each wire with its corresponding terminal to avoid confusion during the new installation. Carefully disconnect the wires from the old thermostat and remove any mounting hardware. Take a photo of the wiring configuration for reference. Safely set aside the old thermostat and prepare for mounting the new one.
3.2 Mounting the New Thermostat
Mount the Honeywell TH8321WF1001 thermostat using the provided U-Mounting Adapter or Straight-Up Mounting Adapter. Ensure the wall is level and use screws and wall anchors for secure installation. Remove any leftover parts from the old thermostat and attach the new base plate. Gently snap the thermostat into place‚ ensuring it clicks securely. Check alignment and tighten screws firmly. For a clean look‚ optional decorative trim rings can be installed around the thermostat to cover wall marks or uneven paint.
3.3 Connecting the Wires to the Correct Terminals
Connecting the wires to the correct terminals is crucial for proper thermostat functionality. Ensure the power is off before starting. Match each wire to its corresponding terminal based on the Honeywell TH8321WF1001 wiring diagram. Typically‚ the red wire connects to the R terminal for 24V power‚ while the white wire goes to W for heating. The yellow wire connects to Y for cooling‚ and the green wire to G for the fan. If present‚ the common wire (C) should be connected to the C terminal. Secure all connections firmly to prevent issues. If unsure‚ consult the installation manual or seek professional assistance to avoid system damage.
3.4 Powering On the Thermostat
After connecting the wires‚ restore power to your HVAC system by switching the circuit breaker to the “on” position. The Honeywell TH8321WF1001 thermostat should automatically power on. Check the screen for illumination or startup messages. If the thermostat does not turn on‚ verify that all wire connections are secure and correct. Ensure the circuit breaker was not tripped during installation. If issues persist‚ consult the installation manual or contact a licensed technician for assistance.
Initial Setup and Configuration
4.1 Unlocking the Thermostat Screen
Press and hold the “Menu” and “Back” buttons simultaneously for 5 seconds to unlock the screen and access settings.
4.2 Setting Up Wi-Fi Connectivity
Go to the “Network” menu‚ select your home Wi-Fi network‚ and enter the password to connect the thermostat to the internet.
4.3 Configuring Basic Settings
Set your preferred temperature‚ heating/cooling mode‚ and schedule. Use the “Menu” button to navigate through options and save your configurations.
To unlock the Honeywell TH8321WF1001 thermostat screen‚ press and hold the “Menu” button until the lock icon disappears. If the screen is locked with a key sequence‚ enter the sequence or use the installer password‚ typically found on the back of the thermostat. If the password is missing‚ restart the device or check the installation manual for reset instructions. Ensure the thermostat is powered on and properly connected to resolve locking issues.
To set up Wi-Fi connectivity for your Honeywell TH8321WF1001 thermostat‚ navigate to the Wi-Fi settings menu on the device. Select your home network from the available options and enter your Wi-Fi password. If prompted‚ confirm the connection by following the on-screen instructions. Ensure the thermostat is in an area with a strong Wi-Fi signal. Once connected‚ a confirmation message will appear‚ and you can use the Honeywell Home app for remote control. Ensure your router operates on a 2.4 GHz network for compatibility.
After unlocking the thermostat‚ navigate to the main menu to configure basic settings. Set the time‚ date‚ and preferred temperature units (Fahrenheit or Celsius). Choose your HVAC system type (e.g.‚ heat pump‚ gas‚ or electric) to ensure proper operation. Select Wi-Fi network and input your password for internet connectivity. Adjust temperature range limits to match your comfort preferences. These initial configurations ensure smooth operation and prepare the thermostat for advanced feature customization.
Advanced Features and Customization
The Honeywell TH8321WF1001 offers advanced features like scheduling‚ customization options for energy efficiency‚ and voice control via smart speakers‚ enhancing smart home integration seamlessly.
5.1 Scheduling Temperature Settings
The Honeywell TH8321WF1001 allows you to create customizable schedules for your home’s temperature. Using the Honeywell Home app‚ you can set specific temperature levels for different times of the day or week. This feature helps optimize energy usage by automatically adjusting settings when you’re away or sleeping. Geofencing technology can also detect your location to prepare your home for your arrival. Scheduling ensures consistent comfort while reducing energy waste‚ making it a practical solution for modern households.
5.2 Adjusting Fan and System Modes
The Honeywell TH8321WF1001 allows you to adjust fan and system modes to optimize comfort and energy efficiency. Use the menu to switch between fan modes like “Auto” or “On” for continuous airflow. System modes include Heat‚ Cool‚ and Off‚ which can be changed based on your needs. Additionally‚ you can configure settings for IAQ (Indoor Air Quality) to improve air circulation. These adjustments can be made manually or scheduled via the Honeywell Home app for automated control.
5.3 Utilizing IAQ (Indoor Air Quality) Settings
The Honeywell TH8321WF1001 allows you to enhance indoor air quality (IAQ) by adjusting settings that improve ventilation and air circulation. Through the Honeywell Home app‚ you can customize IAQ settings to activate the fan or adjust ventilation timing; This feature helps remove stale air and introduce fresh air‚ improving overall comfort and health. By optimizing IAQ settings‚ you can reduce airborne allergens and maintain a balanced humidity level‚ creating a healthier living environment year-round.
Common Issues and Troubleshooting
Common issues with the Honeywell TH8321WF1001 include a locked screen‚ Wi-Fi connectivity problems‚ and wiring misconfigurations. These can often be resolved by resetting the device or checking wire connections. Troubleshooting steps are detailed in the installation manual to ensure proper functionality and user convenience.
6.1 Resolving a Locked Thermostat Screen
If the Honeywell TH8321WF1001 screen is locked‚ press and hold the center button or ‘OK’ to unlock it. The installer password‚ found on a sticker on the back‚ may be required. Enter the password‚ then navigate to settings to adjust as needed. If the sticker is missing‚ contact Honeywell support for assistance. Ensure the thermostat is properly installed and configured to avoid recurring lockouts.
6.2 Troubleshooting Wi-Fi Connection Problems
If the Honeywell TH8321WF1001 thermostat loses Wi-Fi connection‚ restart the device and router. Ensure the thermostat is connected to the correct network. Check for firmware updates and verify router placement for optimal signal strength. If issues persist‚ reset the thermostat by removing batteries or power‚ then reconnect. Consult the installation manual or contact Honeywell support for further assistance.
- Power cycle the thermostat and router.
- Verify network settings and signal strength.
- Ensure firmware is up to date.
6.3 Addressing Wiring Misconfigurations
If wiring misconfigurations occur during installation‚ ensure all wires are correctly matched to their respective terminals as outlined in the manual. Common issues include incorrect placement of the C wire or reversed heating/cooling wires. To resolve‚ turn off power to the HVAC system‚ carefully inspect each wire’s terminal assignment‚ and adjust as needed. Double-check the manufacturer’s wiring diagram for accuracy. If problems persist‚ consult a licensed electrician to prevent system damage or malfunctions.
Accessing Installer Settings
To access installer settings‚ locate the password on the sticker at the back of the thermostat. This is required for re-entering installer setup after initial installation.
7.1 Locating the Installer Password
The installer password for the Honeywell TH8321WF1001 thermostat is typically found on a sticker located on the back of the device. This password is required to access the installer setup menu‚ which allows for advanced system configurations. It is essential for technicians or installers to reference this password during the initial setup or when making changes to the thermostat’s settings. The password ensures that only authorized personnel can modify critical system parameters.
7.2 Navigating the Installer Setup Menu
To navigate the Installer Setup Menu on the Honeywell TH8321WF1001‚ press and hold the “Menu” button until the advanced settings appear. Use the arrow keys to scroll through options like system configuration‚ sensor calibration‚ and wiring verification. The installer password‚ found on a sticker on the thermostat’s back‚ is required for access. This menu allows fine-tuning of settings to optimize performance for specific HVAC systems‚ ensuring proper functionality and compatibility.
Maintenance and Upkeep
Regular maintenance ensures optimal performance. Clean the screen with a soft cloth and check for firmware updates. Inspect wiring connections and ensure proper system calibration.
- Clean the screen regularly for clarity.
- Update firmware to maintain functionality.
- Verify wiring connections for stability.
8.1 Cleaning the Thermostat Screen
To maintain optimal functionality and appearance‚ regularly clean the Honeywell TH8321WF1001 thermostat screen. Use a soft‚ dry cloth to wipe away dust or smudges. For stubborn marks‚ lightly dampen the cloth with distilled water‚ but avoid harsh chemicals or abrasive materials. Ensure the thermostat is powered off before cleaning to prevent accidental inputs. Gently wipe the screen in a circular motion‚ then dry it thoroughly with a clean cloth. Regular cleaning helps preserve the touchscreen’s responsiveness and clarity‚ ensuring a smooth user experience.
8.2 Updating Firmware
To update the firmware on your Honeywell TH8321WF1001 thermostat‚ start by ensuring it is connected to Wi-Fi. Navigate to the “Menu” and select “Settings‚” then “About Thermostat” or “System Info” to check the current firmware version. If an update is available‚ select “Check for Updates” or “Update Firmware” to begin the process. The thermostat will download and install the latest firmware automatically. Avoid interrupting the update to prevent issues. Once complete‚ restart the thermostat to ensure all new features are functional. For manual updates‚ visit the Honeywell website for instructions. Enable automatic updates in settings to keep your thermostat current with minimal effort.
Manufacturer Resources and Support
Honeywell provides comprehensive resources‚ including the official installation manual and customer support. Visit their website for detailed guides‚ troubleshooting tips‚ and contact information for assistance with the TH8321WF1001.
9.1 Accessing the Official Installation Manual
To access the official installation manual for the Honeywell TH8321WF1001‚ visit the Honeywell Home website. Navigate to the support section and search for the model number. Download the PDF manual‚ which provides detailed step-by-step instructions for installation‚ wiring‚ and configuration. Additionally‚ a QR code on the thermostat’s packaging links directly to the manual. Ensure you refer to this guide for accurate installation and troubleshooting procedures.
9.2 Contacting Honeywell Customer Support
For assistance with your Honeywell TH8321WF1001 thermostat‚ visit the official Honeywell Home website. Navigate to the “Support” section‚ where you’ll find contact information‚ including phone numbers and email options. Additionally‚ the Honeywell Home app offers in-app support features‚ allowing you to submit tickets or chat with representatives. For immediate help‚ consider reaching out through Honeywell’s social media channels or checking their regional support pages for localized assistance.